Wednesday 26 September 2018

Assign License on Office 365 in bulk from CSV

This script uses an Input CSV file to assign a specific license on Office 365. it has to be run through PowerShell by connecting to Exchange Online.

The Input CSV file must be "," delimited and contain the below column header:
 - UserPrincipalName

The Usage Location and License type need to be edited in the script (these values are 'hard-coded' into a variable to make it simpler to execute the script without always mentioning the license type in command line)
You can get the license SkuID by running 'Get-MsolAccountSku', and choosing the appropriate license type.
<#
.SYNOPSIS
    Imports user list from CSV file and then assigns license on Office 365

.PARAMETER InputFile
    Path for the Input CSV file

.PARAMETER SkipLine
    Optional parameter for value of line number to start from in CSV file.
    Does not include count for header row (if you want to skip first user, enter 1)

.PARAMETER StartTranscript
    Switch to start transcript and store in current directory as text file.

.DESCRIPTION
    Takes an input file with the column 'UserPrincipalName' and first assigns a UsageLocation 
    as per the $UsageLocation variable 'hard-coded' into the script.
    Then it assigns license to the Office 365 user according to the $License variable also 'hard-coded'
    into the script in Parameter Declarations section. 

.INPUTS
    InputFile - CSV File with "," delimited attributes. Must include a column with header 
    'UserPrincipalName'

.OUTPUTS
    assign_LicenseO365-Log - TXT file containing list of all items processed successfully
    assign_LicenseO365-Error - TXT file contains list of any errors occured during script runtime
    assign_LicenseO365-Transcript - TXT file contains PowerShell transcript (if StartTranscript is used)
  
.NOTES
    Version:        1.0
    Author:         Sidharth Zutshi
    Creation Date:  16/11/2017
    Change Date:    
    Purpose/Change: 

.EXAMPLE
    PS C:\> .\assign_LicenseO365.ps1 -InputFile Users.csv
    
    Runs script for all users in the input CSV file. Assigns license as specified by $License 
    variable in script

.EXAMPLE
    PS C:\> .\assign_LicenseO365.ps1 -InputFile Users.csv -SkipLine 5

    Skips the first 5 users in the CSV file and assigns license for all remaining users.

.EXAMPLE
    PS C:\> .\assign_LicenseO365.ps1 -InputFile Users.csv -StartTranscript

    Runs script for all users in the input CSV file and outputs PS transcript


---------------------------------------------------------------------------------------#>

[CmdletBinding()]
param(
    [Parameter(Mandatory = $True)]
    [ValidateNotNullOrEmpty()]
    [string]$InputFile,
    
    [int]$SkipLine = 0,
    
    [switch]$StartTranscript = $False
    )

$CurrentDate = (Get-Date -Format "dd-MM-yyyy_HH-mm")
$count = 0
$errcount = 0

#region----------------------------------------------[Parameter Declarations]---------------------------------------------------

$OutputLog = ".\assign_LicenseO365-Log_$CurrentDate.txt"
$OutputErrorLog = ".\assign_LicenseO365-Error_$CurrentDate.txt" 
$OutputTranscript = ".\assign_LicenseO365-Transcript_$CurrentDate.txt"
$License = "tenant:ENTERPRISEPACK"                        #Needs to be changed as per your environment SkuID of License
$UsageLocation = "IT"                                     #Needs to be changes as per your usage location

#endregion


#region--------------------------------------------------[Execution Start]-------------------------------------------------------

if ($StartTranscript -eq $True)
{

    Start-Transcript -Path $OutputTranscript
}

#region: Add Header to Log Files and Output
Write-Output "`n`n
Starting script ***assign_LicenseO365*** with parameters set as
------------------------------------------------------
InputFile = $InputFile
License Type = $License
Usage Location = $UsageLocation
StartTranscript = $StartTranscript
Skip Users = $SkipLine
Output Log File = $OutputLog
Output Error Log = $OutputErrorLog
Output Transcript = $OutputTranscript
------------------------------------------------------" 

$Current = (Get-Date -Format "dd-MM-yyyy HH:mm:ss")

$header = "
Script ***assign_LicenseO365*** 
--------------------------------------------------
Started on:  $Current
Input File: $InputFile
License: $License
Skip Users: $SkipLine
"
Write-Verbose "Initializing Log Files and adding Headers..."
$header > $OutputLog
$header > $OutputErrorLog

#endregion

#Import CSV file into variable for processing
Write-Verbose "Importing CSV File for list of user UPNs..." 
$Items = (Import-CSV $InputFile -ErrorAction Stop | Select-Object -Property UserPrincipalName -Skip $SkipLine) 

#region: Loop to process each mailbox
foreach($Item in $Items)
{

    $Error.Clear()

    try
    {       
        Write-Output "Assigning License to $($Item.UserPrincipalName)"     
        
        #ASSIGN LICENSE TO USER IN $ITEM
        $UPN = $Item.UserPrincipalName
        Write-Verbose "        [Set-MsolUser] -UsageLocation $UsageLocation" 
        Set-MsolUser -UserPrincipalName $UPN -UsageLocation $UsageLocation -ErrorAction Stop
        Write-Verbose "        [Get-MsolUser | Set-MsolUserLicense] -AddLicenses $License"
        Get-MsolUser –UserPrincipalName $UPN | Set-MsolUserLicense -AddLicenses “$License”

        
        if($Error.Count -ne 0)
        {
            Write-Host "[ERROR]: Error in assigning license to user! Please see Output Error Logs for details." `
                -ForegroundColor Red

            $string = "--------------------------------------------------
            User = $($Item.UserPrincipalName)
            Error Details:
            "

            $string >> $OutputErrorLog 
            $Error[0] >> $OutputErrorLog
            $Error[1] >> $OutputErrorLog
            $errcount++
        }
        else
        {
            Write-Host "User Licensed successfully." -ForegroundColor Green
            $string = "--------------------------------------------------
            Item Processed with details:
            User = $($Item.UserPrincipalName)"

            $string >> $OutputLog
            $count++
        }
        $Error.Clear()
    }

    catch
    {
        Write-Host "[ERRORCATCH]: Error in assigning license to user! Please see Output Error Logs for details." `
            -ForegroundColor Red

        $string = "--------------------------------------------------
        User = $($Item.UserPrincipalName)
   
        Error Details:
        "

        $string >> $OutputErrorLog 
        $Error[0] >> $OutputErrorLog
        $Error[1] >> $OutputErrorLog
        $errcount++
    }

    finally
    {
        $TotalCount = $count + $errcount
        if($TotalCount -ne 1)
        {
            $Percent = "{0:N2}" -f ($TotalCount/$Items.count * 100)

            Write-Progress -Activity "Assigning Licenses..." `
            -Status "Progress: $Totalcount/$($Items.count)   $Percent% " `
            -PercentComplete $Percent `
            -CurrentOperation "$($Item.SomeProperty)"
        }
    }
}
#endregion

if ($StartTranscript -eq $True)
{
    Stop-Transcript
}


#endregion


#region------------------------------------------------[End Processing]-----------------------------------------------------------

#region: Add footer to Log files and Output
$CurrentEnd = (Get-Date -Format "dd-MM-yyyy HH:mm:ss")
 
Write-Output "`n`n`n**************************End Script**************************`n`n" 
Write-Output "Script Ended on $CurrentEnd
Total Items Processed = $count
Total Errors = $errcount

"

$footerLog = "
--------------------------------------------------
--------------------------------------------------
********************END SCRIPT********************

Script Ended on: $CurrentEnd
Total Items Processed: $count
"

$footerError = "
--------------------------------------------------
--------------------------------------------------
********************END SCRIPT********************

Script Ended on: $CurrentEnd
Total Errors: $errcount
"
Write-Verbose "Adding Footer to Log Files..."
$footerLog >> $OutputLog
$footerError >> $OutputErrorLog
#endregion

#endregion


#--------------------------------------------------------------***End Script***----------------------------------------------------------
Export AD Users with a Last Logon Stamp to CSV

Get-ADUser -Filter * -SearchBase "dc=domain,dc=local" -ResultPageSize 0 -Prop CN,samaccountname,lastLogonTimestamp | Select CN,samaccountname,@{n="lastLogonDate";e={[datetime]::FromFileTime($_.lastLogonTimestamp)}} | Export-CSV -NoType c:\temp\activeusers.csv

Tuesday 20 February 2018

How to handle system reserved partition while performing reverse imaging - Citrix


!!!Consult your Citrix Partner/Support before proceeding!!!

Applicable Products
·         Provisioning Services

Instructions
Part 1 - Boot master target device from vDisk
1.     To allow access to the System Reserved partition, use Disk Management to assign a drive letter to it:
1.     Press WinKey+R (press and hold the Windows key and press R) to open the Run dialog.
2.     Type diskmgmt.msc into the Open box and click the OK button. The Disk Management window will be displayed (may take several seconds to scan the drives).
3.     Right-click on the System Reserved partition and select Change Drive Letter and Paths... from the pop-up menu.
Note: If the System Reserved partition is hidden the label won't be shown (it will be blank) and the option to change the drive letter will be disabled. The partition will most likely be displayed as "100 MB Healthy (Active, Primary Partition)" (the size shown will vary depending on the version of Windows) and be located at the start of the drive, prior to the Windows partition. 
4.     Click the Add button.
5.     An available drive letter will automatically be selected. You can keep it or select a different one. When finished, click the OK button. In this example, E: will be assigned to the System Reserved partition.
6.     Leave the Disk Management window open (it will be needed again in later steps).
 
1.     Press WinKey+E to open Explorer.
2.     Make note of the drive letter assigned to the System Reserved partition and the letter assigned to the Windows partition. In this example, C: is the Windows partition and E:is the System Reserved (booting) partition.

Note: It's a good idea to give the partitions meaningful labels. This can help you tell them apart more easily. For example, the label for the Windows 7 partition might beWin7. This can be especially helpful when trying to tell which partition is which from the Command Prompt.
3.     Close Explorer once you've determined the drive letter assignments.
4.     Start an Administrator mode Command Prompt. To do this in Windows 7, click on theStart button, then All Programs, then Accessories. Right-click on the Command Prompt item and select Run as administrator from the pop-up menu. In Windows 8.x/10, press WinKey+X (or right-click the lower-left corner of the Desktop) and clickCommand Prompt (Admin) on the pop-up menu.
5.       Windows 8.x/10 only: Disable the Windows Recovery Environment (WinRE). Run the following command:
reagentc /disable

Verify that the 
winre.wim file was correctly moved to theC:\Windows\System32\Recovery folder by running the following command (if your Windows partition is not C:, use the letter that's correct for your system). You should see the file in the directory listing.
dir /a C:\Windows\System32\Recovery

Note: This step is necessary because WinRE also needs to be moved from the System Reserved partition to the Windows partition. Leaving WinRE enabled will result in a broken/unusable WinRE after this procedure has completed. If the above command does not report success, you may need to manually copy the WinRE files (in the hidden \Recovery\{GUID} or \Recovery\WindowsRE folder on the System Reserved partition) to an alternate location.
6.     Unload the BCD registry hive by running the following command:
reg  unload  HKLM\BCD00000000
7.     Copy the bootmgr file from the System Reserved (booting) partition to the Windows partition (make sure to use the drive letters as assigned on your computer). Run the following command:
robocopy  e:\  c:\  bootmgr
8.     Copy the Boot folder from the System Reserved (booting) partition to the Windows partition. Run the following command:
robocopy  e:\Boot  C:\Boot  /s
9.     The booting files have now been copied. If you wish to verify that they were copied correctly, run the following command (make sure to use the drive letter of the Windows partition):
dir  c:\  /ah

If the 
bootmgr file and the Boot folder show up in the list, the procedure was successful.
10.  To update the copied BCD file so it will boot correctly, run the following command:
bcdedit  /store  c:\boot\bcd  /set  {bootmgr}  device  partition=C:

Update the Memory Diagnostic entry by running the following command:
bcdedit  /store  c:\boot\bcd  /set  {memdiag}  device  partition=C:

Note: If your Windows partition is assigned a letter other than C:, make sure to use that value instead.

Note: If you are using BootIt BM, you can use the BCD Edit feature to update the BCD file instead of running the above commands. See Part 2 - Step 3 for details.
11.  Close the Command Prompt window.
12.  Remove the drive letter assignment from the System Reserved partition and set the Windows partition as the Active (booting) partition.
1.     Return to Disk Management (reopen, if not left open in Step 2).
2.     Right-click on the System Reserved partition and select Change Drive Letter and Paths... from the pop-up menu.
3.     Click the Remove button.
4.     Click the Yes button to confirm the change.
5.     Right-click on the Windows partition (C:) and select Mark Partition as Active from the pop-up menu.
6.     Click the Yes button to confirm the change. You should see the Active tag move from the System Reserved partition to the Windows partition.
7.     Close the Disk Management window. 
13.  Windows should now be configured to boot properly from its own partition. Restart the computer.
Note: If you receive an error message upon booting, the boot sector of the Windows partition may need to be repaired.
14.    Windows 8.x/10 only: Enable the Windows Recovery Environment (WinRE). To do this, open an Administrator Command Prompt (if necessary, refer to instructions in Step 6) and run the following command:
reagentc /enable

The command should be successful if the previous disable was successful. 
Part 2 - Remove the System Reserved Partition
 
Note:  This part is optional. Removing the partition will only gain 100-500MB unallocated space. However, it will free up one primary partition slot.
Important:  Windows 8.x/10 users may wish to verify that the Windows Recovery Environment (WinRE) functions correctly from the Windows partition before deleting the System Reserved partition. If disabling and enabling WinRE (per Part 1 instructions) failed, the winre.wim file may exist only on the System Reserved partition (in the hidden \Recovery\{GUID} or \Recovery\WindowsRE folder). Deleting the partition in this case would result in losing the file (unless a backup image has been created or the files have been copied elsewhere).
Deleting the partition can be done from either Windows Disk Management or BootIt BM.
Using Disk Management:
1.     If Windows hasn't been rebooted since the completion of the Part 1 instructions, restart Windows. It should boot normally.
2.     Start Disk Management 
3.     Verify that the Windows partition is now tagged as both the System and the Activepartition. The System Reserved partition should just be tagged as Primary Partition.
4.     Right-click on the System Reserved partition.
5.     Select Delete Volume... from the pop-up menu.
6.     Click the Yes button to confirm the deletion.
The space used by the System Reserved partition should now be shown as Unallocated

Monday 5 February 2018

SQL Database in Recovering state

If you need to re-create your SQL AlwaysON cluster and the database goes into "recovering" state, after you delete the Availability Group.

Run the following T-SQL query on "master" database:
RESTORE DATABASE databaseName WITH RECOVERY

Wednesday 7 June 2017

ESXi Unresponsive VM – How to Power Off

Sometimes your VM gets stuck and you have no possibility to do graceful shutdown or power off through the vSphere client. Saying it differently, the VM is stuck and the only way is to reboot the whole ESXi host, which you certainly don’t want to do.
But the unresponsive VM running there can be “killed” through the CLI, yes. This can be done several ways, but I’ll show you a way of doing it through putty SSH session.
First thing to do is to enable SSH on your ESXi Box (select host > configuration > Security profile > Properties > SSh)
We will be using ESXTOP command.
There are different ways to stop ( “kill” ) a VM by using the vCLI, PowerCLI or the console session. In ESXi 5 it is possible to kill a running VM, the process of the VM concerned,  by using  the esxtop command.

ESXi 5 Unresponsive VM – How-to Power Off

Step 1 – connect via SSH by using puty for example and enter esxtop.
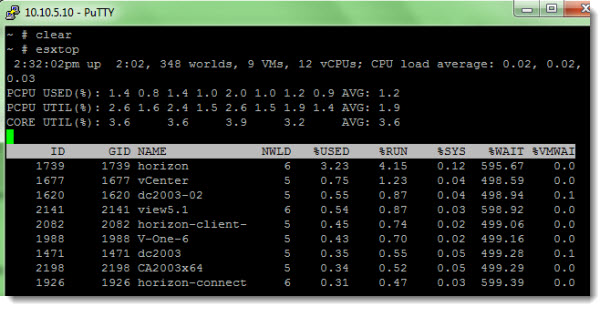
Enter “esxtop”, then press “c” for the CPU resource screen and shift + V to display VMs only.
ESXi 5 Unresponsive VM
Step 2 – changing the display and locating the LWID number
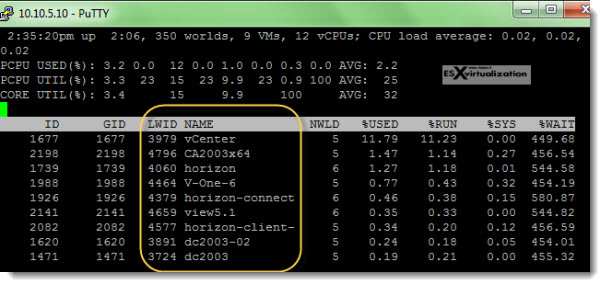
Press “f” to change the display fields and press “c” in order to show the LWID (Leader World Id) and press ENTER.
How to kill unresponsive VM in VMware ESXi 5
Step 3 – Invoking the k (kill) with the number does it…..
Now when you have the  LWID column there, you can see the VM which interests you by the LWID number.
You can press “k” and enter the LWID number of the VM which you want to stop. Note that this is hard stop so, the next time that the VM will boot you’ll probbably see this screen (depending on your guest OS of course).
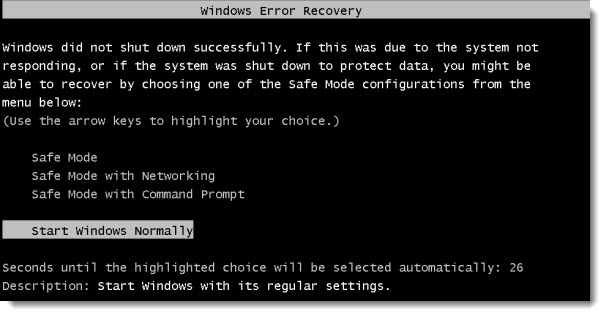
VMware ESXi 5 - How to kill an unresponsive VM through command line
If this method don’t work, you can’t vmotion the VM elsewhere or any other option don’t work either, there might be a hardware problem with the host which can lead into PSOD.
There is also this KB which discuses other methods including the one described here –  ESXi Unresponsive VM – VMware Kb. Also you might want to check Using hardware NMI facilities to troubleshoot unresponsive hosts (1014767)

https://www.vladan.fr/esxi-5-unresponsive-vm-h/

Tuesday 6 June 2017

Error “Unable to load client print control” when printing reports in Reporting Services

If the users weren’t administrators or power users, the issue could be resolved by deploying the files manually:


1.       You can search your SQL server for the following file rsclientprint.cab

2.       Extract the files from the rsclientprint.cab file.

3.       Copy all the files to your RDS/TS box. If you are running 64bit, copy it to c:\windows\syswow64

c:\print\RSClientPrint.dll

c:\print\rsclientprint.inf

c:\print\RsClientPrint_1028.rl

c:\print\RsClientPrint_1031.rl

c:\print\RsClientPrint_1033.rl

c:\print\RsClientPrint_1036.rl

c:\print\RsClientPrint_1040.rl

c:\print\RsClientPrint_1041.rl

c:\print\RsClientPrint_1042.rl

c:\print\RsClientPrint_2052.rl

c:\print\RsClientPrint_3082.rl

4.       Register RSClientPrint.dll by opening a command line in elevated mode (Start->Run) regsvr32 [path]RSClientPrint.dll

Thursday 1 June 2017

Citrix XenApp 7.13 - Redirected printers are not showing in devices and printers

I had an issues today with printers not showing in devices and printers.
A client is running XenApp 7.13 on Win 2012R2 Datacentre.

I found that one of my optimization scripts for XenApp have disabled a services called Device Setup Manager. Once I started the service, printers re-appeared.

An interesting observation though, redirected printers were available for printing, just not visible in the devices and printers menu.

Here is an office Citrix Solution: https://support.citrix.com/article/CTX213540